OpenSSL 简介
OpenSSL 是一个实现了 传输层安全 (Transport Layer Security, TLS v1) 网络协议和相关加密标准的加密工具箱.
openssl 是在 shell 中使用 OpenSSL 加密库中各种加密函数的命令行工具.
openssl <command> [command_opts] [command_args]

# 查看版本
openssl version -a

# 分别列出当前 openssl 工具中所有 standard commands, message digest commands 或 cipher commands 的名称
openssl list-standard-commands
openssl list-message-digest-commands
openssl list-cipher-commands

# 分别列出所有 cipher 和 message digest 的名称,有别名的话以 from => to 的形式显示
openssl list-cipher-algorithms
openssl list-message-digest-algorithms

# 列出所有支持的公钥算法
openssl list-public-key-algorithms

# 查看指定名称的 command 是否可用,命令不存在,输出 no-<command>,命令存在,输出 <command>
openssl no-<command>
Pass Phrase Arguments
openssl 中有几个命令可以接受密码参数,例如 pkcs12。通常使用 -passin 和 -passout 做为输入和输出密码。密码可以有多种形式,其格式如下所述。
| Format | Description |
|---|---|
pass:password |
the actual password is password. Since the password is visible to utilities (like ‘ps’ under Unix) this form should only be used where security is not important. |
env:var |
obtain the password from the environment variable var. Since the environment of other processes is visible on certain platforms (e.g. ps under certain Unix OSes) this option should be used with caution. |
file:pathname |
the first line of pathname is the password. If the same pathname argument is supplied to -passin and -passout arguments then the first line will be used for the input password and the next line for the output password. pathname need not refer to a regular file: it could for example refer to a device or named pipe. |
fd:number |
read the password from the file descriptor number. This can be used to send the data via a pipe for example. |
stdin |
read the password from standard input. |
如果命令要求输入密码,但未在参数中提供密码,则命令会在终端提示用户输入密码。
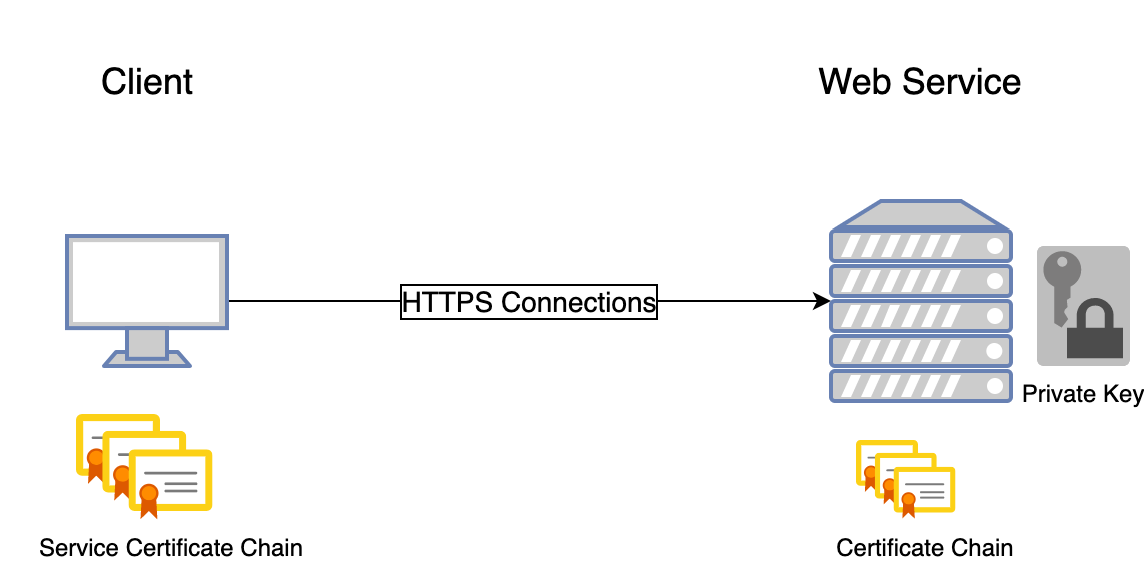
证书与私钥
使用 HTTPS 方式访问 Web 服务,客户端需要信任由服务端生成的证书。
编码格式
同样的证书或私钥,可能有不同的编码格式,目前有以下两种编码格式.
-
DER - Distinguished Encoding Rules,二进制格式的证书或密钥,不可读.
-
PEM - Privacy Enhanced Mail,BASE64 编码的 DER 证书或密钥,带有额外的页眉和页脚.
证书 (PEM 格式)
证书扩展名一般为 “.pem”,”.crt” 或 “.cer”
以 -----BEGIN CERTIFICATE----- 作为开头
以 -----END CERTIFICATE----- 作为结尾
-----BEGIN CERTIFICATE-----
MIICfDCCAWQCCQC1WdJznfCazDANBgkqhkiG9w0BAQsFADAAMB4XDTE5MTIxNjEz
MDkzMFoXDTIwMTIxNTEzMDkzMFowADCCASIwDQYJKoZIhvcNAQEBBQADggEPADCC
AQoCggEBAJpj/KqgVcECEYGa05ZrxL0Zf7IP6goPwf9ePrrMIw5J/5KZVJN/d9nV
R/MOH/n7eOI3n3MrHcHRuo1Vww8ZNOkXO/7FMSzFIeWkygwM34nI7wXYSjEjV2DF
QPhItwkYWZJJToxGxLSgrWDm+VqoNEtXJLAtJ/tcj5GSknbQ6E+KKHUKon1UzDDe
wosEIVQqezRVZICIIt25wTL3cHzZNJP3smq990nJ764VOZ/oGCYgtZLMrM2UYan8
Z93hdz8opuD1kRlpb9ouPM2/f9k7ajOIdm+v2IOrofvQaPQ5KnWiai6FZXvxCaCp
T4uzXFiosZJLziK/0TLDcoUZQpXf/40CAwEAATANBgkqhkiG9w0BAQsFAAOCAQEA
RnVPDjk/oeTrHviM6p4RtRq6+tsKtQWFt7EnvWAlbnv05cSdTVCoiXUJVGQbMstV
a3KTOtnBBiTXSrsnNkTSeY+sKlW+Hwo20MAat5nhj0696RLXfNcHRHutHhAq8qJK
wkdE5mNiWxf7g+CbAEdbzbti94CNJ5b0VzOth5XY28o/fLsKGqspa7K3F5iPEbt6
RcJpaR10bcwTHEDs5ObMLdbigQWuJg6Ko8Rfbakpiq1ow+9RbZtpa1eOA5Z15Wh1
TxvUXvdxO8/78KLVk6lwhaNXqZTdzZqK7Oi7Bd3YhwwaauA98Rm3RJdYNkycjyde
1VYZpKI+qnyNS6tut8z+fg==
-----END CERTIFICATE-----
私钥(PEM 格式)
私钥扩展名一般为 “.pem” 或 “.key”
以 -----BEGIN RSA PRIVATE KEY----- 作为开头
以 -----END RSA PRIVATE KEY----- 作为结尾
-----BEGIN RSA PRIVATE KEY-----
MIIEowIBAAKCAQEAmmP8qqBVwQIRgZrTlmvEvRl/sg/qCg/B/14+uswjDkn/kplU
k3932dVH8w4f+ft44jefcysdwdG6jVXDDxk06Rc7/sUxLMUh5aTKDAzficjvBdhK
MSNXYMVA+Ei3CRhZkklOjEbEtKCtYOb5Wqg0S1cksC0n+1yPkZKSdtDoT4oodQqi
fVTMMN7CiwQhVCp7NFVkgIgi3bnBMvdwfNk0k/eyar33ScnvrhU5n+gYJiC1ksys
zZRhqfxn3eF3Pyim4PWRGWlv2i48zb9/2TtqM4h2b6/Yg6uh+9Bo9DkqdaJqLoVl
e/EJoKlPi7NcWKixkkvOIr/RMsNyhRlCld//jQIDAQABAoIBACzKVzIVI+vDstp7
1WitST1nGWHKNibHHYv9hotgz8bEdw3Lx/qmn1mmA6Ki9Wnrp81RP8QEvTROqSV5
vQYzVONOp0wpXzPS2RurbCaE0ZFCpv12G0gYLbBYaZneVqOf2dSTyeLuYQDaIJKd
T7gaVlmJJY6q+w90cf5UnIM15j+0rNruBRxu7RlbDlzaX1KXJA87CpuATozBg/hq
yC3g/K+WcTLfxp+xabd/8K7cGkEcQBkf0uHoUgD9gXvDt2TPfLtkb9yl/mmiGAh5
o21xQd+fYCsYBTpkPSqC9al+tOs/yQ1CbsTEjmLuytrajXbQ6mHSmQqb2zp8fTQx
3a1G0SECgYEAylotEQ9pr5nfoKj78ANhSV6GKNcOBf2XpJAaHEuzGYqyPYv25lMc
CW0bOyQO7hwcSpM5OnZshgVimcoT7FcN2zcycDdt9zqbRHqqoNHvhN6i/FPaoIuo
WmwgY3058yvbKBDj77oUv+ErMLYbYaLuDcalO1ChOTBLRmMQxJMmPCkCgYEAw1Kc
Lx6BI51PMiY0yNvTyE8i8aCGN3eNxwetKI7mVIx3p6rb45vjS0P08UOtaqb6sZ1M
whE0fSUnGENQ+wuO5+ZWK6c2OrSLgHFTwGjBrcPvPdXec2+SLxYTJPqiVRzTEAOL
IrE2y09fIMqdWO3l0VX8JF5yllzEFtmRAp7MlMUCgYB1LkNq3cIWLsWSBEnhdBOi
qVqHzAIS9ggbBFgairvszqTpf2Q7fWV/D+/1D6yVtzGq/hbmBC5UbknrRVrEQqWD
jTNoSLEluoqv3VlySCCskUFRXj39OuMDehpHgv1MFNmVGjLlYJ0jgQHB87NnlzLE
R4ToFIlI1O7ClBvhulUqAQKBgQCuRD5lK+o8RFYsgDoIG1nRFgovWvFk+53bPdYY
oaaPOORpC+A0KxmYRYF84M0Qovp5Dcc2PvN91HAVDbpqwd02uiOXvxB7QCpW5sW6
nbxvtKj3mqFmjNz4ddGO5K+BEL6fQwoYYdRpgN92+k940IiDRRw5tqq1zP6HBIaE
t/n/oQKBgGBlP2WkS0Z8eX+CI59sD/TL1IZYPwZIfgVQ604Ycim3BatehdDWezk2
gP+frXcbdgp6jgsLWqn6uRxI3Cp/3qJCWr3foeDsyyxEDJjJXi77heIwoyOsfDDQ
1qur+70lLbptxciDt6UJOLX4BkzvzdaagakB+hHJoClNTmDCUGMB
-----END RSA PRIVATE KEY-----
PKCS - Public Key Cryptography Standards (公钥密码学标准)
PKCS#7 - 密码消息语法标准(Cryptographic Message Syntax Standard)
x509 是数字证书的基本规范,而 PKCS#7 和 PKCS#12 是证书的两种封装形式,两者都可以封装 X509 证书。例如图片有 raw format,但也可以通过 JPEG 或 GIF 等格式来存储转发。
openssl pkcs7 命令用于处理 PKCS7 格式的证书
PKCS#10 - 证书申请标准(Certification Request Standard)
该标准规范了向证书中心申请证书之CSR(certificate signing request)的格式。 在 PKI 系统中,一个 证书签名请求 (CSR) 是申请者为了向 CA 中心申请 数字身份证书 而发送的信息。下面是一个 CSR 中需要的典型信息。
| DC | Information | Description | Sample |
|---|---|---|---|
CN |
Common Name | 希望保证安全的域名 FQDN | *.wikipedia.org |
O |
Organization Name | 组织或公司名称 | Wikimedia Foundation, Inc. |
OU |
Organizational Unit Name | 部门名称 | IT |
L |
Locality / City | 城市或地区 | San Francisco |
ST |
State or Province | 省/州 | California |
C |
Country | 两字母的国家代码 | US |
MAIL |
Email address | 公司或部门的联系邮箱 | support@it.corp.com |
openssl req 命令用来创建和处理 PKCS10 格式的证书,这些信息可以写在配置文件中,例如创建一个名为 openssl.cnf 的配置文件,内容如下:
PKCS#12 - 个人消息交换标准(Personal Information Exchange Syntax Standard)
PKCS12 是一种证书存储格式,用于实现将许多加密对象存储在一个单独的文件中。通常用它来打包一个私钥及有关的 X.509 证书,或者打包信任链的全部项目。
openssl pkcs12 命令用来解析或者创建 PKCS12 格式的证书。
openssl rsa
RSA 是常用的非对称加密算法,用于生成公钥和私钥对.
rsa 常用选项
-
-aes256
使用 aes256 算法加密私钥,并要求输入一个保护密码 -
-out
输出到指定文件,如果没有该选项,则输出到屏幕 -
numbits
生成密钥所需要的 bit 长度
rsa 常用命令
# 生成 4096 位不带密码保护的私钥
openssl genrsa -out key.pem 4096

# 生成 4096 位带密码保护的私钥
openssl genrsa -aes256 -out key.pem 4096
- 打印密钥文本
openssl rsa -in key.pem -text -noout
- 读取私钥,输出公钥
openssl rsa -in key.pem -pubout -out public.pem
- 删除私钥的保护密码
openssl rsa -in encrypted.key -out unencrypted.key
- 给私钥添加密码保护
openssl rsa -aes256 -in unencrypted.key -out encrypted.key
- 将私钥从 PEM 格式转换成 DER 格式
openssl rsa -in key.pem -outform DER -out key.der
-
ssh生成公钥的命令
ssh-keygen -y -f id_rsa > id_rsa.pub
openssl req
req 配置文件
openssl req 命令接受 -config 选项,可以从指定的配置文件中读取配置,配置选项写在配置文件中的 [ req ] 部分,具体配置选项和取值参考 openssl req 手册的 CONFIGURATION FILE FORMAT 部分,主要用到的选项如下:
-
distinguished_name
- 指定配置文件中的某个段名,该段包含证书或证书申请中关于名称的各个字段和默认值。
-
req_extensions
- 指定配置文件中的某个段名,该段包含要加入证书申请中的一系列扩展,可被命令行
-reqexts选项改写。
- 指定配置文件中的某个段名,该段包含要加入证书申请中的一系列扩展,可被命令行
-
x509_extensions
- 指定配置文件中的某个段名,该段包含要加入证书中的一系列扩展,可被命令行
-extensions选项改写。
- 指定配置文件中的某个段名,该段包含要加入证书中的一系列扩展,可被命令行
关于扩展段的格式及取值等信息,可以查看 x509v3_config 手册页,下面是配置文件的一个例子
# vi:ft=dosini

[ req ]
distinguished_name = req_distinguished_name
req_extensions     = v3_req
x509_extensions    = v3_ca   # The extensions to add to the self signed cert

[ req_distinguished_name ]
countryName                     = Country Name (2 letter code)
countryName_default             = CN
stateOrProvinceName             = State or Province Name (full name)
stateOrProvinceName_default     = Bejing
localityName                    = Locality Name (eg, city)
localityName_default            = Bejing
organizationName                = Organization Name (eg, company)
organizationName_default        = Example Company
organizationalUnitName          = Organizational Unit Name (eg, section)
organizationalUnitName_default  = Security
commonName                      = Common Name (e.g. server FQDN or YOUR name)
commonName_max                  = 64
commonName_default              = *.example.com
emailAddress                    = Email Address
emailAddress_max                = 64
emailAddress_default            = security@example.com

[ v3_req ]
subjectAltName = @alt_names

[ v3_usr ]
# Extensions for a user cert
subjectKeyIdentifier    = hash
authorityKeyIdentifier  = keyid, issuer
basicConstraints        = CA:FALSE
keyUsage                = nonRepudiation, digitalSignature, keyEncipherment
extendedKeyUsage        = serverAuth, clientAuth
subjectAltName          = @alt_names

[ alt_names ]
DNS.1   = *.galaxy.com
DNS.2   = galaxy.com
IP.1    = 10.10.10.10

[ v3_ca ]
# Extensions for a typical CA
subjectKeyIdentifier    = hash
authorityKeyIdentifier  = keyid:always, issuer:always
basicConstraints        = critical, CA:true
keyUsage                = critical, digitalSignature, keyCertSign, cRLSign
req 常用选项
-
-days <n>
指定证书有效期,默认是30天,与-x509选项一起使用 -
-newkey rsa:2048
生成一个新的证书申请,同时生成一个 2048 位的 RSA 私钥 -
-keyout <keyfile>
新私钥要写入的文件 -
-nodes
不对新私钥加密 -
-key <keyfile>
读取指定的私钥文件. -
-text
同时打印纯文本版本和编码版本信息 -
-noout
不打印编码后版本 (BASE64编码) -
-new
生成一个新的证书申请,会提示用户输入相关字段的值,如果没有 -key 选项,会使用指定配置文件中的信息生成一个新的 RSA 私钥. -
-x509
生成自签名证书,而不是请求一个证书. 通常用于生成测试证书或自签名根证书. -
-subj <arg>
申请人信息,格式是/C=CN/O=Corp/.../CN=www.ez.com,可以使用\转义,不会跳过空格. -
-[digets] 指定签署请求时使用的信息摘要算法,如
-md5,-sha1,-sha256
req 常用命令
- 生成一个 4096 位的无密码保护私钥和一个新的证书申请,使用 openssl.cnf 中的配置信息
openssl req -newkey rsa:4096 -nodes -keyout key.pem -out req.pem -config openssl.cnf
- 使用已有的私钥生成一个新的证书申请
openssl req -new -key key.pem -out req.pem
- 查看证书申请
openssl req -in req.pem -noout -text
生成自签名根证书
- 同时生成私钥和自签名根证书
# valid for 30 years
openssl req -x509 -days 10950 -newkey rsa:4096 -nodes -keyout key.pem -out cert.pem -config openssl.cnf
- 使用已有私钥生成自签名根证书
# valid for 20 years
openssl req -x509 -days 7300 -key key.pem -out cert.pem -config openssl.cnf
x509v3_config
对 CA 证书或普通证书,下面是推荐的常用扩展选项,取值以及解释。
Certificate Authorities & Intermediate CAs
Self-signed CA
-
keyUsage:
cRLSign,digitalSignature,keyCertSign- Should not contain any other KUs or EKUs
-
V3 Profile:
[ v3_ca ]
basicConstraints        = critical, CA:TRUE
subjectKeyIdentifier    = hash
authorityKeyIdentifier  = keyid:always, issuer:always
keyUsage                = critical, cRLSign, digitalSignature, keyCertSign
subjectAltName          = @alt_ca
Intermediate CA
-
keyUsage:
cRLSign,digitalSignature,keyCertSign- Should not contain any other KUs or EKUs
-
V3 Profile:
[ v3_ica ] basicConstraints = critical, CA:TRUE, pathlen:1 subjectKeyIdentifier = hash authorityKeyIdentifier = keyid:always, issuer:always keyUsage = critical, cRLSign, digitalSignature, keyCertSign subjectAltName = @alt_ica- Where
pathlen:is equal to the number of CAs/ICAs it can sign - Can not sign other CAs/ICAs if
pathlen:is set to 0
- Where
Non-CA Certificates
VPN Server
-
keyUsage:
nonRepudiation,digitalSignature,keyEncipherment,keyAgreement -
V3 Profile:
[ v3_vpn_server ]
basicConstraints        = critical, CA:FALSE
subjectKeyIdentifier    = hash
authorityKeyIdentifier  = keyid:always, issuer:always
keyUsage                = critical, nonRepudiation, digitalSignature, keyEncipherment, keyAgreement
extendedKeyUsage        = critical, serverAuth
subjectAltName          = @alt_vpn_server
VPN Client
-
keyUsage:
nonRepudiation,digitalSignature,keyEncipherment -
V3 Profile:
[ v3_vpn_client ]
basicConstraints        = critical, CA:FALSE
subjectKeyIdentifier    = hash
authorityKeyIdentifier  = keyid:always, issuer:always
keyUsage                = critical, nonRepudiation, digitalSignature, keyEncipherment
extendedKeyUsage        = critical, clientAuth
subjectAltName          = @alt_vpn_client
keyUsage
CA ONLY
keyCertSign
- Subject public key is used to verify signatures on certificates
- This extension must only be used for CA certificates
cRLSign
- Subject public key is to verify signatures on revocation information, such as a CRL
- This extension must only be used for CA certificates
digitalSignature
- Certificate may be used to apply a digital signature
- Digital signatures are often used for entity authentication & data origin authentication with integrity
nonRepudiation
- Certificate may be used to sign data as above but the certificate public key may be used to provide non-repudiation services
- This prevents the signing entity from falsely denying some action
keyEncipherment
- Certificate may be used to encrypt a symmetric key which is then transferred to the target
- Target decrypts key, subsequently using it to encrypt & decrypt data between the entities
dataEncipherment
- Certificate may be used to encrypt & decrypt actual application data
keyAgreement
- Certificate enables use of a key agreement protocol to establish a symmetric key with a target
- Symmetric key may then be used to encrypt & decrypt data sent between the entities
encipherOnly
- Public key used only for enciphering data while performing key agreement
-
Req. KU:
keyAgreement
-
Req. KU:
decipherOnly
- Public key used only for deciphering data while performing key agreement
-
Req. KU:
keyAgreement
-
Req. KU:
extendedKeyUsage
serverAuth
- All VPN servers should be signed with this EKU present
- SSL/TLS Web/VPN Server authentication EKU, distinguishing a server which clients can authenticate against
- This supersedes
nscertypeoptions (ns innscertypestands for NetScape [browser]) -
Req. KU:
digitalSignature,keyEnciphermentorkeyAgreement
clientAuth
- All VPN clients must be signed with this EKU present
- SSL/TLS Web/VPN Client authentication EKU distinguishing a client as a client only
-
Req. KU:
digitalSignatureand/orkeyAgreement
codeSigning
- Code Signing
-
Req. KU:
digitalSignature,nonRepudiation, and/orkeyEnciphermentorkeyAgreement
-
Req. KU:
emailProtection
- Email Protection via S/MIME, allows you to send and receive encrypted emails
-
Req. KU:
digitalSignature,keyEnciphermentorkeyAgreement
-
Req. KU:
timeStamping
- Trusted Timestamping
-
Req. KU:
digitalSignature,nonRepudiation
-
Req. KU:
OCSPSigning
- OCSP Signing
-
Req. KU:
digitalSignature,nonRepudiation
-
Req. KU:
msCodeInd
- Microsoft Individual Code Signing (authenticode)
-
Req. KU:
digitalSignature,keyEnciphermentorkeyAgreement
-
Req. KU:
msCodeCom
- Microsoft Commerical Code Signing (authenticode)
-
Req. KU:
digitalSignature,keyEnciphermentorkeyAgreement
-
Req. KU:
mcCTLSign
- Microsoft Trust List Signing
-
Req. KU:
digitalSignature,nonRepudiation
-
Req. KU:
msEFS
- Microsoft Encrypted File System Signing
-
Req. KU:
digitalSignature,keyEnciphermentorkeyAgreement
-
Req. KU:
openssl x509
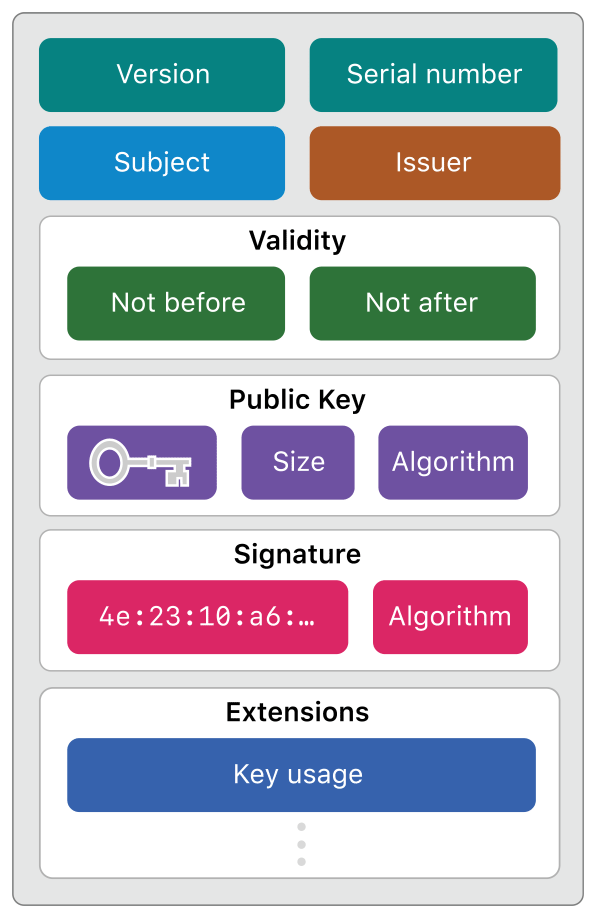
X.509 是公钥证书 (Public Key Certificate) 的标准格式,用来证明公开密钥持有者的身份。此文件包含了公钥信息、持有者身份信息(主体)、以及数字证书认证机构(发行者)对这份文件的数字签名,以保证这个文件的整体内容正确无误。
openssl x509 命令可以显示证书信息,转换证书格式 (PEM <-> DER), 像 mini CA 一样签署一个证书请求,或者编辑证书。
x509 常用命令
- 查看证书完整信息
openssl x509 -in cert.pem -noout -text
- 查看 DER 格式证书
openssl x509 -in cert.der -inform der -text -noout
- 转换 DER 格式证书到 PEM 格式
openssl x509 -inform DER -in cert.der -out cert.pem
- 查看证书日期信息
openssl x509 -in cert.pem -noout -dates
- 查看证书过期时间
openssl x509 -in cert.pem -noout -enddate
- 查看证书 subject
openssl x509 -in cert.pem -noout -subject
- 查看证书发布者信息
openssl x509 -in cert.pem -noout -issuer
- 查看证书 SAN (Subject Alternative Name)
openssl x509 -in cert.pem -noout -ext subjectAltName
- 检查目录及子目录中所有
.pem和.crt后辍的证书日期
find . -regextype egrep -iregex '.*(pem|crt)' -print0 | xargs -0 -I% sh -c 'echo; echo %; openssl x509 -in % -noout -subject -ext subjectAltName -enddate'
使用 X509 的 -CA 参数签发证书
首先通过 openssl req 命令生成自签名根证书,并以此证书作为 CA 来签发新证书。
与 openssl req 的 -config 选项类似, openssl x509 命令使用 -extfile 选项,从配置文件中读取要加入到证书的扩展选项。
注意:openssl 1.1.1 版本的 openssl x509 命令无法将 csr 文件中的扩展复制到证书,可以参考问题 Subject Alternative Name is not copied to signed certificate。而 openssl 3.x 版本的 openssl x509 命令可以使用 -copy_extensions copy 参数将 csr 文件中的扩展复制到证书文件。此特性同样适用于 -x509toreq 参数。
当签署证书时,CA 需要为每个证书生成一个唯一的序列号,由于每个证书的序列号对于每个颁发者都必须是唯一的,因此颁发者需要跟踪它以前使用过哪些序列号,以确保它不会重复使用任何序列号。OpenSSL 提供了一种使用序列号文件进行跟踪的简单方法。当你指定 -CAcreateserial 时,它会将序列号 01 或一个随机数分配给签名证书,然后默认创建一个名为 ca.srl 的序列号文件。在未来的签名操作中,应该使用 -CAserial ca.srl 而不是 -CAcreateserial,OpenSSL 将为每个签名的证书增加该文件中的值。这样,CA 证书签署一系列证书时,它们的序列号都是唯一的。
- openssl 1.1.1 版本
使用 -extfile openssl.cnf 和 -extensions v3_usr 参数给证书添加扩展项。
# valid for 5 years
openssl x509 -req -in req.pem -days 1825 -CA cacert.pem -CAkey cakey.pem -CAcreateserial -out cert.pem -extfile openssl.cnf -extensions v3_usr
- openssl 3.x 版本
使用 -copy_extensions copy 参数从 csr 文件复制扩展项。
# valid for 3 years
openssl x509 -req -in req.pem -days 1095 -CA cacert.pem -CAkey cakey.pem -CAcreateserial -out cert.pem -copy_extensions copy
将 csr 转换为自签名证书
openssl x509 命令的 -in 参数默认需要读入一个证书文件,但使用 -req 参数后,则需要读入一个证书申请文件,并输出一个自签名的 ca 证书。
# valid for 10 years
openssl x509 -req -in careq.pem -days 3650 -key key.pem -out cacert.pem -extfile openssl.cnf -extensions v3_ca
从证书生成 csr
# openssl version 1.1.1,extensions can't be copied
openssl x509 -x509toreq -in vpc-lab.pem -out req.pem -signkey vpc-lab.key

# openssl version 3.x
openssl x509 -x509toreq -in vpc-lab.pem -out req.pem -signkey vpc-lab.key -copy_extensions copy
PEM 证书长度
PEM 标准(RFC1421)强制证书每行使用64个字符,否则会遇到类似下面的 bad base64 decode 报错
2675996:error:0906D064:PEM routines:PEM_read_bio:bad base64 decode:pem_lib.c:818:
可以使用 UNIX 工具 fold 将单行的 PEM 证书转换为标准的每行 64 字符的证书
fold -w 64 oneline.pem > standard.pem
检查 key, csr, cert 是否匹配
- 比较证书申请,证书和私钥中所包含公钥信息的 MD5 值,确保它们一致。
openssl rsa -noout -modulus -in key.pem | openssl md5

openssl req -noout -modulus -in csr.pem | openssl md5

openssl x509 -noout -modulus -in cert.pem | openssl md5
- 使用一条命令来比较证书与私钥是否匹配
openssl x509 -noout -modulus -in cert.pem | openssl md5 ;\
openssl rsa -noout -modulus -in key.pem | openssl md5
- 使用脚本检查
#!/usr/bin/env bash

# script name: keymatch

if [ "$#" -ne 2 ]; then
    echo "Usage: $0 <key|cert|csr file> <key|cert|csr file>"
    echo "Example1: $0 key.pem cert.pem"
    echo "Example2: $0 key.pem req.pem"
    exit 1
fi

function match {
    # Set color variables
    Red=$(tput setaf 1) Green=$(tput setaf 2) Yellow=$(tput setaf 3)
    R=$(tput rev) NC=$(tput sgr0)

    hash1=$(mod_hash $1)
    hash2=$(mod_hash $2)

    printf "%-30s md5 value: %s\n" "${Green}$1${NC}" "${Yellow}$hash1${NC}"
    printf "%-30s md5 value: %s\n" "${Green}$2${NC}" "${Yellow}$hash2${NC}"

    if [ "$hash1" = "$hash2" ]; then
        echo -e "$R${Green}match.${NC}"
    else
        echo -e "$R${Red}not match!${NC}"
    fi
}

function mod_hash {
    # Get the module hash value from the input key|cert|csr file

    if grep -q '\-----BEGIN PRIVATE KEY-----' $1 2>/dev/null; then
        echo $(openssl rsa -modulus -noout -in $1 | openssl md5)
    elif grep -q '\-----BEGIN CERTIFICATE-----' $1 2>/dev/null; then
        echo $(openssl x509 -modulus -noout -in $1 | openssl md5)
    elif grep -q '\-----BEGIN CERTIFICATE REQUEST-----' $1 2>/dev/null; then
        echo $(openssl req -modulus -noout -in $1 | openssl md5)
    else
        echo -e "The input file ${Red}$1${NC} must be a valid key|cert|csr file."
        exit 1
    fi
}

match "$@"
证书内容
Certificate:
    Data:
        Version: 3 (0x2)
        Serial Number:
            10:e6:fc:62:b7:41:8a:d5:00:5e:45:b6
        Signature Algorithm: sha256WithRSAEncryption
        Issuer: C=BE, O=GlobalSign nv-sa, CN=GlobalSign Organization Validation CA - SHA256 - G2
        Validity
            Not Before: Nov 21 08:00:00 2016 GMT
            Not After : Nov 22 07:59:59 2017 GMT
        Subject: C=US, ST=California, L=San Francisco, O=Wikimedia Foundation, Inc., CN=*.wikipedia.org
        Subject Public Key Info:
            Public Key Algorithm: id-ecPublicKey
                Public-Key: (256 bit)
            pub:
                    00:c9:22:69:31:8a:d6:6c:ea:da:c3:7f:2c:ac:a5:
                    af:c0:02:ea:81:cb:65:b9:fd:0c:6d:46:5b:c9:1e:
                    9d:3b:ef
                ASN1 OID: prime256v1
                NIST CURVE: P-256
        X509v3 extensions:
            X509v3 Key Usage: critical
                Digital Signature, Key Agreement
            Authority Information Access:
                CA Issuers - URI:http://secure.globalsign.com/cacert/gsorganizationvalsha2g2r1.crt
                OCSP - URI:http://ocsp2.globalsign.com/gsorganizationvalsha2g2
            X509v3 Certificate Policies:
                Policy: 1.3.6.1.4.1.4146.1.20
                  CPS: https://www.globalsign.com/repository/
                Policy: 2.23.140.1.2.2
            X509v3 Basic Constraints:
                CA:FALSE
            X509v3 CRL Distribution Points:
                Full Name:
                  URI:http://crl.globalsign.com/gs/gsorganizationvalsha2g2.crl
            X509v3 Subject Alternative Name:
                DNS:wikipedia.org, DNS:*.mediawiki.org, DNS:wikimedia.org
            X509v3 Extended Key Usage:
                TLS Web Server Authentication, TLS Web Client Authentication
            X509v3 Subject Key Identifier:
                28:2A:26:2A:57:8B:3B:CE:B4:D6:AB:54:EF:D7:38:21:2C:49:5C:36
            X509v3 Authority Key Identifier:
                keyid:96:DE:61:F1:BD:1C:16:29:53:1C:C0:CC:7D:3B:83:00:40:E6:1A:7C

    Signature Algorithm: sha256WithRSAEncryption
         8b:c3:ed:d1:9d:39:6f:af:40:72:bd:1e:18:5e:30:54:23:35:
         ...
openssl pkcs7
pkcs7 常用命令
# 将 p7b 格式的证书转换成 x509 格式的证书
openssl pkcs7 -print_certs -in cert.p7b -out cert.pem
打印单文件中的多证书信息
openssl crl2pkcs7 -nocrl -certfile chained.pem | openssl pkcs7 -print_certs -noout -text

# Only print subject, dates and subjectAltNames information
openssl crl2pkcs7 -nocrl -certfile chained.pem | openssl pkcs7 -print_certs -noout -text | grep -P '(Subject|Not Before|Not After\s|DNS):'
openssl pkcs12
PFX 和 P12 都是 PKCS12 文件。因为历史原因,PFX 是 Microsoft 常用扩展名,P12 是 Netscape 常用扩展名,这两个扩展名可以互换使用。
pkcs12 常用命令
- 创建 PKCS12 文件,包含私钥,证书,CA证书,别名及文件保护密码
openssl pkcs12 -export -inkey key.pem -in cert.pem -certfile CACert.pem -out keystore.p12 -name entry_alias -passout pass:password
注意,OpenSSL 3.0 版本生成的 P12 文件使用了新的算法,JDK 8 版本的 keytool 读取新版本的 P12 文件会报错,
keytool error: java.io.IOException: keystore password was incorrect
因此如果需要兼容老版本,在使用 OpenSSL 3 版本的 pkcs12 命令时,需要加入 -legacy 选项,
openssl pkcs12 -legacy -export -inkey key.pem -in cert.pem -certfile CACert.pem -out keystore.p12 -name entry_alias -passout pass:password
注意:PKCS12 文件中存储的私钥将使用与 PKCS12 文件相同的保护密码
- 解析 PKCS12 文件
openssl pkcs12 -in keystore.p12

# 解析 PKCS12 文件并输出到文件
openssl pkcs12 -in keystore.p12 -out keystore.pem
- 输出 PKCS12 文件中的所有证书到文件
openssl pkcs12 -in keystore.p12 -nokeys -out cert.pem
- 输出 PKCS12 文件中的 client 证书到文件
openssl pkcs12 -in keystore.p12 -nokeys -clcerts -out cert.pem
- 输出 PKCS12 文件中的 CA 证书到文件
openssl pkcs12 -in keystore.p12 -nokeys -cacerts -out cert.pem
- 输出 PKCS12 文件中的私钥到文件,私钥无密码保护
openssl pkcs12 -in keystore.p12 -nocerts -out key.pem -nodes
- 查看 PKCS12 文件中的证书链和私钥
openssl pkcs12 -in keystore.p12 -chain
- 查看 PKCS12 文件中的证书链和私钥的额外信息
openssl pkcs12 -in keystore.p12 -info
Java KeyStore (JKS)
Java KeyStore 是 Java 存储私钥和公钥信息的存储格式,从 JDK8 开始,Java 推荐使用 PKCS12 格式的密钥库。keytool 是 Java 密钥和证书管理工具,用来操作 Java KeyStore 文件。
keytool 命令中用到两种密码
- storepass: 密钥库的保护密码
- keypass: 密钥库中存储的私钥的保护密码
keytool -importkeystore 命令用于将源密钥库中的单个条目或所有条目导入到目标密钥库。
- 提供 srcalias 选项后,该命令会将别名标识的单个条目导入目标密钥库。
- 如果目标别名未提供 destalias,则将 srcalias 用作目标别名。
- 如果源条目受密码保护,则 srckeypass 将用于恢复该条目。
- 如果未提供 srckeypass,则
keytool将尝试使用 srcstorepass 恢复该条目。 - 如果未提供 srcstorepass 或它不正确,则将提示用户输入密码。
- 目标条目将使用 destkeypass 保护。如果未提供 destkeypass,则目标条目将保持源条目密码。
- 如果未提供 deststorepass ,则将提示用户输入密码。
- 如果未提供 srcalias 选项,那么源密钥库中的所有条目都将导入到目标密钥库中。
- 每个目标条目将存储在源条目的别名下。
- 如果源条目受密码保护,则将使用 srcstorepass 恢复该条目。
- 如果未提供 srcstorepass 或它不正确,则将提示用户输入密码。
- 如果目标密钥库中不支持源密钥库条目类型,或者在将条目存储到目标密钥库中时发生错误,则会提示用户是跳过条目还是退出。
- 目标条目将受到源条目密码的保护。
- 如果目标别名库中已经存在目标别名,则会提示用户覆盖该条目,或使用其他别名创建新条目。
keytool 常用命令
- 将密钥库类型从 PKCS12 转换为 JKS,目标条目使用与源条目相同的别名
keytool -importkeystore -srckeystore keystore.p12 -srcalias entry_alias -srcstoretype pkcs12 -srcstorepass storepass -destkeystore keystore.jks -deststorepass storepass -deststoretype JKS
- 将密钥库类型从 JKS 转换为 PKCS12,目标条目使用与源条目不同的别名
keytool -importkeystore -srckeystore keystore.jks -srcalias entry_alias -srcstorepass storepass -destkeystore keystore.p12 -destalias other_alias_name -deststoretype pkcs12 -deststorepass storepass
注意: PKCS12 不支持密钥库和私钥使用不同的保护密码,所以转换到 PKCS12 格式的密钥库时,如果指定了 destkeypass 和 deststorepass ,那么密码必须相同。
- 查看 keytool 子命令帮助
keytool -importcert -help
- 修改密钥库保护密码
keytool -storepasswd -keystore keystore.jks -storepass origin_storepass -new new_storepass
- 修改 keypass 保护密码
keytool -keypasswd -keystore keystore.jks -storepass password -alias friendly_name -keypass origin_keypass -new new_keypass
- 修改别名
keytool -changealias -keystore keystore.jks -storepass password -alias old_name -destalias new_name
- 查看证书文件
keytool -printcert -file cert.pem -v
- 打印密钥库中指定别名的证书,以可读方式显示
keytool -list -keystore keystore.jks -storepass password -alias friendly_name -v
- 打印密钥库中指定别名的证书,以 PEM 格式显示
keytool -list -keystore keystore.jks -storepass password -alias friendly_name -rfc
-
导入证书到指定密钥库
-
导入新的受信任证书时,密钥库中不能存在相同的别名。
-
在将证书添加到密钥库之前,
keytool尝试使用密钥库中的可信证书构建从该证书到自签名证书 (通常是一个根CA) 的信任链来验证它 -
如果使用
-trustcacerts选项,则 cacerts 密钥库中的证书也会被添加为信任链中的可信证书。
-
keytool -importcert -trustcacerts -keystore keystore.jks -storepass password -alias friendly_name -file cert.pem
- 导出 PEM 格式证书
keytool -exportcert -keystore keystore.jks -storepass password -alias friendly_name -rfc -file cert.pem
- 删除证书
keytool -delete -keystore keystore.jks -alias friendly_name -storepass password
JRE cacerts
从 JDK9 以后,如果命令中 keystore 是 java 的 cacerts,keytool 提供了 -cacerts 参数,其作用相当于 -keystore /path/to/cacerts。查询 keytool 官方文档以了解命令具体用法,以 JDK11 和 JDK8 为例:
打印 JRE cacerts 密钥库
# JDK8
keytool -list -keytsotre $JAVA_HOME/jre/lib/security/cacerts -storepass changeit

# JDK9 and later versions
keytool -list -cacerts -storepass changeit
导入证书到 JRE cacerts 密钥库
# JDK8
keytool -importcert -keytsotre $JAVA_HOME/jre/lib/security/cacerts -storepass changeit -alias friendly_name -file cert.pem

# JDK9 and later versions
ketytool -importcert -cacerts -storepass changeit -alias friendly_name -file cert.pem
openssl s_client
s_client 是一个以 SSL 协议连接远程服务器的客户端程序,该工具可以用于测试诊断。
常用参数如下:
-
-connect host:port
指定远程服务器的地址和端口,如果没有该参数,默认值为 localhost:443 -
-cert filename
若服务器端需要验证客户端的身份,通过 -cert 指定客户端的证书文件。 -
-key filename
指定私钥文件。 -
-verify depth
打开服务器证书验证并定义证书验证过程中的最大深度。 -
-servername host
在与服务器的通信中包含 SNI (Server Name Indication) 信息来指明要通信的服务器。 -
-showcerts
显示服务器证书链,如果没有此选项,默认只显示服务器当前证书。 -
-CAfile filename
指定用于验证服务器证书的根证书。 -
-state
打印出 SSL 会话的状态。
With SNI (Server Name Indication)
如果远程服务器使用的是 SNI(即在一个 IP 地址上共享多个 SSL 主机),则需要 -servername example.com 发送指定的主机名才能获得正确的证书。
openssl s_client -servername example.com -connect example.com:443 </dev/null 2>/dev/null
Without SNI
- 如果远程服务器未使用 SNI,则可以跳过
-servername参数:
echo | openssl s_client -connect localhost:443 2>/dev/null
- 使用 HTTP 代理
echo | openssl s_client -proxy 10.1.1.8:8800 -connect localhost:443
- 显示服务器证书的详细信息
echo | openssl s_client -connect localhost:443 | openssl x509 -noout -text
- 显示服务器证书的所有者,SAN和过期时间
echo | openssl s_client -connect localhost:443 2>/dev/null | openssl x509 -noout -subject -enddate -ext subjectAltName
- 检查 PostgreSQL 数据库使用的证书(需要使用
openssl 1.1.1之后的版本)
echo | openssl s_client -starttls postgres -connect localhost:5432 2>/dev/null | openssl x509 -noout -subject -enddate -ext subjectAltName
- 显示证书的 PEM 格式部分
# 单证书
echo | openssl s_client -connect localhost:443 | openssl x509

# 证书链
echo | openssl s_client -showcerts -connect localhost:443 | sed -ne '/-BEGIN CERTIFICATE-/,/-END CERTIFICATE-/p'
证书打印函数
此函数可以通过 SSH Config 文件来配置跳转主机,打印远程主机证书。
#!/usr/bin/env bash

# script name: chkcert

# Set color variables
Red=$(tput setaf 1) Green=$(tput setaf 2) Yellow=$(tput setaf 3)
Blue=$(tput setaf 4)
R=$(tput rev) NC=$(tput sgr0)

function usage {
    echo "Usage: $0 [-d] [-j <jump_host>] [-o s_client opt] <fqdn> [port]"
    echo "       -d only print the command like dry run."
    echo "       If no jump host provided, default jump host set in script will be used."
    echo "       If no port provided, the default port is 443."
    echo
    echo "Example1: print the cert info of a service on a host with default jump host and port"
    echo "${Green}$0${NC} test.example.net ${Blue}8000${NC}"
    echo
    echo "Example2: print the cret info of a VIP in production"
    echo "${Green}$0${NC} ${Blue}-j jump-host${NC} vip.example.com"
    echo
    echo "Example3: print the cert info of PostgreSQL database"
    echo "${Green}$0${NC} ${Blue}-j jump-host -o '-starttls postgres'${NC} postgresql.example.com 5432"
    exit 1
}

# Use openssl@3 from homebrew
openssl="$(brew --prefix)/opt/openssl@3/bin/openssl"

# Set default jump host
jump_host='default-ljump'

while getopts ":dj:o:" opt; do
    case "${opt}" in
        d)
            dry_run=true
            ;;
        j)
            jump_host=${OPTARG}
            ;;
        o)
            s_client_opt=${OPTARG}
            ;;
        *)
            usage
            ;;
    esac
done
shift $((OPTIND-1))

if [[ $# -eq 1 ]]; then
    server=$1
    port="443"
elif [[ $# -eq 2 ]]; then
    server=$1
    port=$2
else
    usage
fi

cmd="ssh ${jump_host} 'echo | openssl s_client ${s_client_opt} -connect ${server}:${port} 2>/dev/null' | ${openssl} x509 -noout -subject -dates -ext subjectAltName"

if [ "$dry_run" = true ]; then
    echo $cmd
    exit 0
fi

printf "%s\n\n" "${cmd}"
eval "${cmd}"
echo
openssl s_server
| Item | Location |
|---|---|
| CA certificate (public key) | ca_certificate.pem |
| Server certificate (public key) | server_certificate.pem |
| Server private key | server_key.pem |
| Client certificate (public key) | client_certificate.pem |
| Client private key | client_key.pem |
openssl s_server -accept 8443 \
  -cert server_certificate.pem -key server_key.pem -CAfile ca_certificate.pem
上面的命令将启动一个 OpenSSL s_server 进程,使用提供的CA证书,服务器证书和私钥。用于测试对TLS连接的证书进行完整性检查。
openssl s_client -connect localhost:8443 \
  -cert client_certificate.pem -key client_key.pem -CAfile ca_certificate.pem \
  -verify 8 -verify_hostname CN_NAME
将 CN_NAME 替换为希望验证的主机域名或证书中的 CN 名称。这将打开与上面启动的示例TLS服务器的新TLS连接。 可以不使用-verify_hostname参数,但是OpenSSL将不再执行该验证。